How to Arduino #1 — Installing the IDE and Uploading Your First Sketch
Before you can do anything with an Arduino, you need three things: the hardware, the IDE installed on your computer, and one successful upload under your belt. This post covers all three.
The goal isn’t a fancy project — it’s the Blink example, which flashes the onboard LED. Boring on purpose. Getting Blink running verifies that your IDE is installed correctly, your board is recognized, the drivers are working, and the upload pathway is clear. Every more interesting project builds on exactly this foundation.
Installing the Arduino IDE
Go to arduino.cc/en/software and download the IDE for your operating system. The current version installs like any other application: on Mac, drag it to Applications; on Windows, run the installer. The whole thing takes a few minutes.
On Mac, you may need to approve the app in System Preferences → Security & Privacy the first time you run it. On Windows, the installer usually handles USB driver installation automatically — if you get a “port not found” error later, check Device Manager for yellow warning icons on COM ports and install the CH340 or CP2102 driver depending on which USB chip your board uses.
The hardware: Uno vs. Nano
The Arduino Uno and the Arduino Nano both use the same ATmega328P chip and have the same capabilities for most beginner projects. The practical differences:
The Uno is larger, has a standard USB-B port, and is the board most tutorials assume. Its pins are on header strips that stick out — you wire to it with jumper wires that bridge from the Uno’s headers to your breadboard.
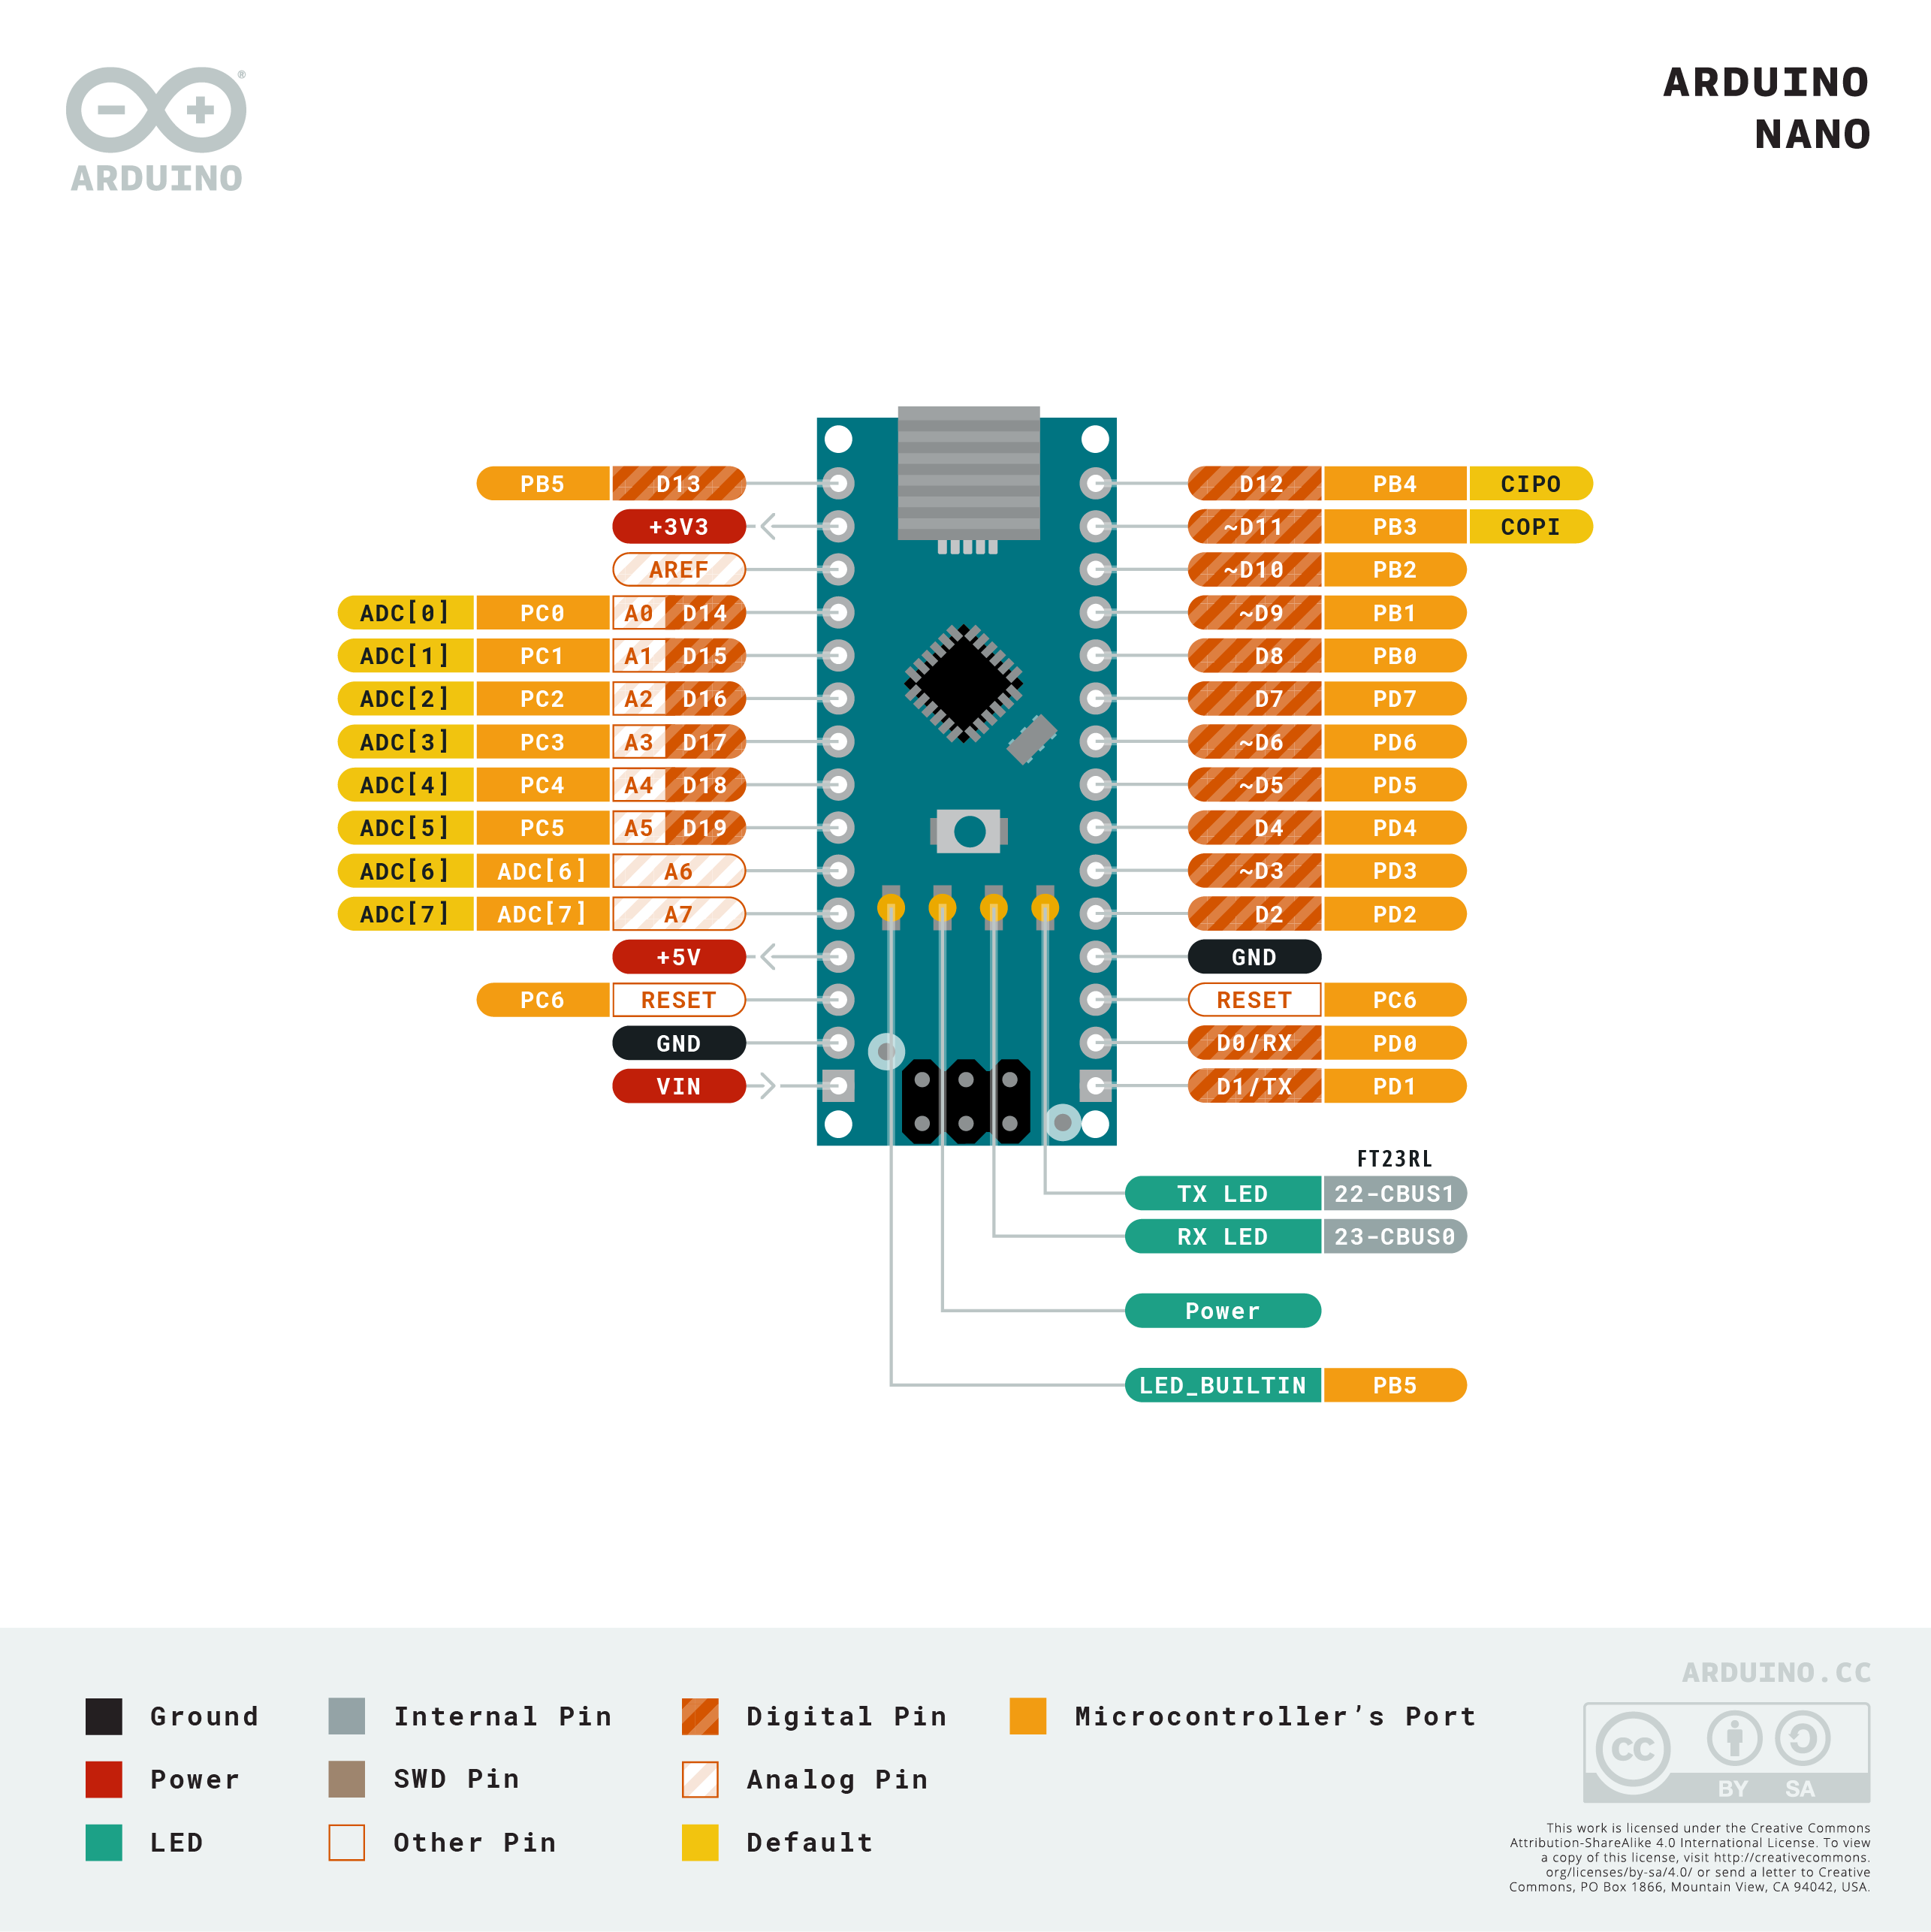
The Nano is smaller and cheaper, has a Mini-USB port, and has two rows of pins along the bottom edge designed to sit directly in a breadboard. No bridging jumpers needed. Pick up the breadboard and the Nano comes with it. For a workbench learning setup where you’re constantly rewiring, this is more convenient than the Uno’s external-jumper arrangement.
The code and pin numbering are identical between them. Everything in this series works on either board.
Two settings you must get right
Before uploading anything, two settings in the IDE need to match your hardware:
Board selection (Tools → Board): Pick the specific board you’re using. For the Uno: Arduino AVR Boards → Arduino Uno. For the Nano with the ATmega328P: Arduino AVR Boards → Arduino Nano, with the processor set to “ATmega328P.” If your Nano is an older clone, it may use the older bootloader — try “ATmega328P (Old Bootloader)” if uploads fail.
Port selection (Tools → Port): This is the serial port the Arduino is connected to. On Mac it shows up as something like /dev/tty.usbserial-XXXXX or /dev/cu.usbmodem1234. On Windows it’s a COM port number (COM3, COM4, etc.). If you don’t see any ports, the USB driver isn’t installed or the cable is bad — try a different cable first.
Uploading Blink
With the board and port set, open File → Examples → 01.Basics → Blink. This is the standard first sketch.
You’ll see three sections in the code, which is also the shape of every Arduino program:
// Global area — runs before anything else
int ledPin = 13;  // built-in LED is on pin 13

void setup() {
  // Runs once at startup
  pinMode(ledPin, OUTPUT);  // tell pin 13 it's an output
}

void loop() {
  // Runs forever
  digitalWrite(ledPin, HIGH);  // LED on
  delay(1000);                 // wait 1 second (1000 ms)
  digitalWrite(ledPin, LOW);   // LED off
  delay(1000);                 // wait 1 second
}
Global area: variable declarations and library includes. Anything declared here is accessible from both setup() and loop().
setup(): runs once when the board powers up or resets. Use it for initialization — pin modes, serial port speed, library setup.
loop(): runs continuously, forever, until you cut power. This is where your program’s actual behavior lives. The Arduino has no operating system and no way to exit the loop — when it reaches the closing brace, it immediately starts over from the top.
Click the upload button (right arrow icon, or Ctrl+U / Cmd+U). The IDE compiles the sketch, then transfers it to the board. You’ll see the TX/RX LEDs flash during upload and a “Done uploading” message in the status bar. The onboard LED on pin 13 should start blinking at one-second intervals.
Proving the loop runs
Change both delay(1000) values to delay(100) — 100 milliseconds each. Upload again. The LED blinks ten times faster. Change to delay(5000) and it blinks every 5 seconds. This confirms two things: the loop is actually repeating, and delay() takes milliseconds, not seconds.
The breadboard basics
The breadboard you’ll use for nearly every project after this has a specific internal connection structure that’s worth understanding before you plug anything in.
The main rows in the center of the board run horizontally. Every hole in a given row (typically five holes per row) is connected to every other hole in the same row — but the connection stops at the central gap running down the middle of the board. Holes on the left of the gap are isolated from the matching holes on the right, even if they’re on the same numbered row. This allows you to straddle a chip across the gap so each pin has its own isolated row.
The power rails on the long edges run vertically — all the holes in the red (+) rail are connected to each other along the full length of the board, same for the blue (–) rail. Connect 5V from the Arduino to the red rail and GND to the blue rail, and power is available to any component anywhere along the edge without running individual wires back to the Arduino for each one.
References and further reading
- Arduino IDE download — the current IDE; as of 2.x, it includes a built-in library manager and serial plotter
- Arduino Blink example reference — the canonical first sketch walkthrough on the Arduino site
- Arduino language reference —
pinMode(),digitalWrite(),delay(), and every other built-in function - CH340 USB driver (if needed) — the most common driver issue with clone Nano boards; install this if Windows or Mac doesn’t recognize the serial port
- Arduino Nano pinout — side-by-side pin reference for the Nano’s compact header layout